Creating 3D Maps with Coreldraw
How to create a 3-dimensional map with coreldraw commonly used for wedding invitations, invitation walimahan, and others that look more attractive and look different with the look of a site plan or a direction other way.
CorelDraw Tutorial Basic level there are three main stages then you will learn such things as:
- Transform objects
- Group / combine objects
- Make a line with the bezier tool
- Changing the line into objects
- Changing jenist point point on the line
- Coloring the object and lines
- Changing the size of the line
- Using the bezier tool
- Using the Shape Tool
- Creating 3D objects (three-dimensional) with CorelDraw etc.
All you have to do first is mngetahui form of rough road, street name, building name and complementary directions. You can use an existing map via google maps and in print the next screen enter into coreldraw a way to import (CTRL + I).
1. Insert image from google maps that you print screen by clicking the Import File menu (CTRL + I). To end the import click where you want to put these Gamber. You can also enter through click drag the image from explorer to coreldraw.

2.Kunci location of the image so as not to move the location by right click on the image and select Lock Object.


To change or edit a line using a line shape tool :

When you are finished copying delete the image next map by right-clicking on the image select Unlock and delete. Fix once more on the lines that do not close completely.

4. Please select the size of the line with all these lines can be by way of a line SHIFT + CLICK highlight one by one or all of them with the pick tool and then change the line size to 16 pt.

5. Change the line into objects by selecting all lines and click Menu Arrange> Convert Outline to attractions.
6. Merge all objects into one section of the line using the Weld.

7. Paint the shape object by clicking the color white with white and black right-click on the color palette so that the object shape has a line of black (color palete is on the right side workpace)
8. Type the existing road to the text tool (F8) and turn adjust the direction of the road (try the same font size and be in the road). If all the text is in place, turn into a curve by means of selection all the way text and click Menu Arrange> Convert to Curve.

9. Selection of all objects (roads and writing the way) and join by right clicking on one of the selected objects select Group (CTRL + G)
10. Perform the transformation on the object selected above using the Interactive Envelope Tool. Customize the shape transformation of the view that you want.

11. If completed as desired and click Menu Arrange> Convert to Curve.
12. Broke out again between the road and the joint text by right-clicking on the object and choose Ungroup (CTRL + U).
13. Select the first object using the Pick Tool and make ends CLICK CLICK + DRAG Right (do copy paste if difficulties in this technique) so the two. Position the second path is under the latter path and change the color to black. Put the second object is under the first object (overwrite) using right click> Order> To Back of Page (SHIFT + Page Down).

14. Using the Shape tool closes street corners to resemble three-dimensional objects. Do a double click to add a point point, try to type point at the street corners in the form of line (straight line). To close this corner used to activate the snap to objects that point we'll be sticking to the moving object closest.

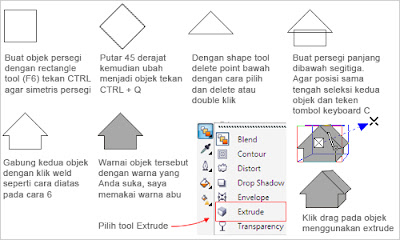
15. Next create buildings, homes, important places and so with the Rectangle Tool (F6) and change into 3 dimensions using extrude.
16. Place the objects in the right place with your maps. Copy and paste the desired places. Repeat Make different objects fit the way to building 15 and other places. Write the name of the place, the name of the building to its name using the text tool.
17. The result I can get is as follows.

Acknowledgments With luck and Happy eraktifitas With this article. and do not forget to join with other friends on Facebook AhliDesain, and follow my Twitter. If you like my articles from do not forget to include it in ahlidesain subscribe to the RSS Feed.


0 komentar:
Posting Komentar